Showing posts with label Willy Minis. Show all posts

Tuesday, December 10, 2013

A Blogger's Busted Beastman...

Before I begin, just wanted to express my gratitude and appreciation to everyone who helped me reach 4,000 hits!  While this is a 'hiccup' compared to some of you who have been following my blog (who are now in the hundreds of thousands of hits) I can only say that every journey begins with it's first step... Thank you everyone! :D
 
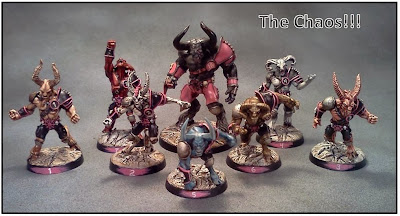
Following my minor, self-adjudicated accolade, I had to share this loner beastman, that was supposed to be posted with the rest of the commissioned Chaos team which I finished and delivered.  Here he is, charging forward in an awesome pose, with malevolent intent ready to take out the opposition!
(check him out at Cool Mini or Not!)
 
I was unable to include him in this pic from a while back, because he was missing an arm (my fault-another story for another day! LOL!) So, I emailed Jorge Ruiz Munillo (Willy Mini Owner) and he was most gracious at getting me the extra arm so that I could finish this guy off and get him to the owner... a million thanks Jorge! (Muchisimas Gracias Compa!)
 
Thanks again to everyone who has been gracious enough to keep checkin in... I have purpose behind what I am doing here, and hope to let the "cat out of the bag" in short order! Make it a great day! :D

Saturday, December 7, 2013

Some More Pink Pajamas!

It has truly been a loooong day indeed! A GREAT day, but a long one!  I had promised the "finished" product of the Chaos Warriors that I showed the glazes on yesterday... but sometimes 'hanging out' at the local gaming and hobby store as a featured painter draws customers with questions (which I don't mind, because I love to share!), but it ate up some of my production time yesterday! :D  As a result, it took a good portion of the morning to finish these guys up.  Being at the location of the Blood Bowl Season Opener, naturally forced me to get in a couple of matches, hence... this post is long over due!

Here is the warrior that I showed yesterday, finished after the glazes, and polyurethane coating is applied, I like the position of him charging in for the attack!  But, there are actually three additional Chaos Warriors in the troop... scroll down to see them!
(vote on this pic at Cool Mini or Not!)
 
Below are the other three; kind of like the "four horsemen" of the Apocalypse they are each posed very uniquely! This Chaos Warrior looks like he is getting ready to thump on an opponent standing in his way!
(Vote on this mini at Cool Mini or Not!)
 
The next chap is moving forward, getting ready to throw a vicious block on the opposition...
(click any pic to enlarge)
(You can also vote on this guy at Cool Mini or Not!)
 
This mini is my client's favorite of the troupe... the pose almost give you the sense that he has just laid someone out on the pitch, and now he is looking to see where else he can go to do some damage! he he he
(check him out at Cool Mini or Not!)
 
Here are the four of them together!
(click the pic to enlarge)
(Nice pic of these crazys at Cool Mini or Not!)
 
While the Minotaur was in a previous post, I just had to include a pic with him in it!

Overall, I am very pleased with how these guys turned out!  It was loads of fun putting the finishing touches on them in the store with all the foot traffic... several people came up and share positive comments on how they looked; but the most gratifying comment of all, came from the owner when he showed up for delivery and simply stated, "I am very pleased with the final result!"  Thanks for letting me take on this project, Joe! Most gratifying! :D

Friday, December 6, 2013

Pink Pajamas with Penguins on the Bottom!

My sincerest apologies to all of you faithfuls out there... in the throws of trying to finish up a mega-display (12 foot long) in preparation for a store opening tomorrow! (Eeek!) Truthfully, there was not hardly a second to spare to get up this post yesterday! At any rate, I have been receiving quite a few requests on "how to's" as well as tool spotlights, and some theory... so here is a bit more on "glazing."

I am finishing up some Chaos Warriors for a commission team, and the client wanted a full 'pink diva' look on his Chaos.  Not an easy task on armor, especially when wanting to highlight the subtle shapes.  Only way to get the right look is with glazes.  At the end of this post, I will include a brief five minute youtube video on this technique.

In this first pic I am needing to differentiate between the "high" points on the mini, and the "low" points on the mini, specifically on the armor.  Because the armor is one piece, I can only do this with subtle color changes invisible to the naked eye.  In order to accomplish this, I must patiently pass the brush over the area I want to change with just a tiny bit of paint on it... this is known as a 'glaze'.  Here I am beginning to add some purple shading to the lower, shady portions of the armor... you can barely even see the difference.
(click any pic to enlarge)
 
Increased, but more defined differentiation due to the increased amount of shading that has been provided, it is easier to see that shading on the model accomplished by more application of paint through glazing...
 
Still more differentiation because I have applied some glazed highlights to the miniatures... the definition is just now starting to show.
 
Finally, even more increased differentiation by glazing in highlights to the 'higher' points of the model, with definition and contrast resultant from the shaded glazes as well; as I have state before, putting 'snow in the mountains' (light paint on the high points), and 'shadow in the valleys' (darker paint in the recesses), there is nice differentiation and depth! (I am now adding the black trim to the armor as well to make it really 'pop'!)
 
Well, here is a teaser for you... I will be posting the "four horsemen of the apocalypse" tomorrow! Notice how the glazing has created subtle color palette changes so fine that you cannot differentiate exactly where the change begins, and where it ends... that is the result that one wants through a glazing technique; not fast but very effective!
 
www.coolminiornot.com/346649

I was surprised to find myself chuckling as I was loading this pic, which reminded that someone once told me the chanting in the theme song from the Lion King strangely sounds like they are chanting "pink pajamas, penguins on the bottom"!!! LOL
Thanks for having a look! Catch ya tomorrow! :D
 
(you can vote on this guy at Cool Mini or Not!)
 
(Here is a link to a decent five minute video that briefly shares some glazing theory and technique by "miniwargamerj")

Tuesday, December 3, 2013

Post Dremel Despoiler Done!

Well, yesterday I highlighted the Dremel tool (specifically the cutting tip), and promised a "how to" with some dry-brushing... so here it is:

Now that Lord Borak's base is cured, and I have primed and painted some glazed highlights on his armor, as well as the skull-headed boot (I am sure he uses to foul payers with! :D), let me cover some basics on the dry-brush...

Here are two colors, Citadel's Celestial Grey and Ceramite White...
 
I am going to start by putting some feathery-light touches on this base with this dry-brushing brush...
(click any pic to enlarge)
 
I am going to make sure that there is just enough paint for it to "stick" to the ridges in the sculpted base, so I will wipe off any excess I might have on some paper towel...


As I pass the brush over the base, I am being careful to ensure that they are "feather-light" almost caressing the ridges of the sculpt so that the dry-paint will stick...

After dry-brushing on the grey, I am going to pass over the same area with some white to increase the 'depth' between the darkness in the shadows, and the highlights on the ridges, thus giving some real texture to the base...

If you look at the previous pic just before the one above, you will notice a subtle but important difference in the two photos; the first with some grey highlights, but notice how the second one 'pops' more with definition!
 
Here is the finished model!
(click the pic to enlarge)
www.coolminiornot.com/346512
 
Let me know what you think by going to Cool Mini or Not and voting!
Hope this simple dry-brush tutorial was helpful! :D
Any feedback you have is welcome.

Monday, December 2, 2013

A Dremel a Day keeps Lord Borak at Bay!

Recently I was asked about doing some additional "How To's" by my friend Joe, (another Blood Bowl Coach, and all around "nice-guy") in addition to doing some "Tool Spotlights"; so with that in mind, I happened to be finishing up one of his star players (Lord Borak the Despoiler) for his Chaos team, so thought I would share...

First off is the tool highlight, which is on the Dremel; any serious modeler and miniature convertor has one!  This bad boy has a variety of tool-tips available for use, and with it's precision cutting, engraving, drilling, and sanding tips... you can't beat it!
 
For this post, I used the cutting tool as I needed to cut away the basing stand for the mini, since I was going to pin it to the base.
(click here for a youtube demo of the tool in action!)
 
 
Here is a pic of me attempting to cut the base away of the mini; it was too big to sand down, and it seemed much simpler to just remove it for pinning the mini to the base.  You can see the line I drew on the basing stand what it would take to level it off with the base... waaaaay too much to sand down!


Here is the basing stand properly removed:
 
 
 With the basing stand removed, I can now properly "pin" Lord Borak! (he he, yes I am a former wrestler! :D)

Now I am going to use quick drying "grey stuff" to apply a generous coating of putty on the base, this will serve two purposes: 1) It will give it some texture so I can paint it to look like the chaos wastelands, but 2) It will also give the miniature a solid platform with which to stand and stay secure!

(Still not having broken down and purchases some sculpting tools... I am using my X-acto knife to sculpt the putty into place)

Hope this is helpful to you, and be sure to check back tomorrow as I will be finishing this guy up! More on glazing and/or dry-brushing!

(Here is a tutorial on Greenstuff from my friends at Tale of Painters!)

Monday, November 25, 2013

Tenacious Tentacles!

I can honestly say I am not a fan of Chaos anything in gaming; Chaos armies (Fantasy or 40K), Chaos teams for Blood Bowl, the Chaos Iconography and background stories, etc., and all that goes along with it! That being said... I can be open to pure talent, and insightful ideas when it comes to minis, sculpting and the like in this miniature world we put ourselves in (for those of us who choose to!)

With a recent commission job winding down on a Chaos Blood Bowl team, I thought I would share this rare sculpt of a star player, Lewdgrip Whiparm--I think this is the only sculpt out there of this particular star player--at least if there is, I have never seen one!
 
 I tried to give him that 'rusty brass' look as I think the tentacle arm is just disgusting, and it reminds me of sea creatures; so naturally he would be all rusted and corroded from that salty sea water! LOL!!
 
Here some additional side and back shots with the main one in the middle...
('click the pic' to enlarge him at Cool Mini or Not!)
www.coolminiornot.com/345880
 I also had to pick a color that would tie him into the existing Chaos Team he will be playing for... that putrid, light green I used worked well for this, and the base was just another way to tie him into said team as well.
 
A very well fabricated mini from concept, to sculpt from Willy Miniatures!
Thanks for giving us another phenomenal miniature to add to the growing Blood Bowl line of star players! :D
 

Thursday, October 31, 2013

Just Beastly!!!

Here is a 'partial' of a commission job I took after virtually begging the owner of these phenomenal Willy minis to let me paint them!  He wanted pink (once again! *wink*) and 'natural' colors on his Beastmen.  So, we have: buckskin, dapple grey, apparitional white, blue-roan, brown, strawberry-roan, and devil-saur red!
(With each picture you can "click the pic" to vote at Cool Mini or Not!)
www.coolminiornot.com/344288
For those 'gamers' out there who just like to play (as well as for you hobbyists/artists out there who know what I mean), each miniature painted is really a labor of love!  Each miniature you paint is unique and becomes even more unique when you add paint to it!  Really LOVE the result of how these guys turned out! 
 
www.coolminiornot.com/344289
Already posted this guy once, but since I have the beastmen finished, I wanted to share each one individually.  First off, I did the bases using fast-drying 'white-stuff' to give them that "Chaos Wasteland" feel (these guys are probably tossing the pigskin in the deserts out there!).  Painted No1 with a buckskin color as the owner wanted these guys in 'natural' tones.  Love the pose!
 
www.coolminiornot.com/344291
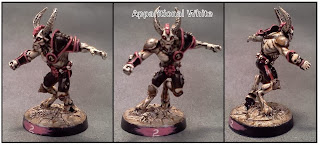
The No2 Beastman I painted in an 'apparitional white' because he looks like he is gliding... almost as if he were a ghost!  He is incredibly lean and looks almost malnourished.  That, coupled with his 'punk' mowhawk, it just seemed the right color-scheme for him!
 
www.coolminiornot.com/344292
Beastman No3 was painted a 'strawberry-roan' color due to his goat-like horns and positional forward movement like he is getting ready to head-butt someone!
 
www.coolminiornot.com/344293
Here are all three... the Gruesome Threesome!
 
Well, there are still a few more to put up... which I will include in tomorrow's post!


Saturday, October 26, 2013

Chaos Warrior w/Chainsaw

This outstanding mini from Willy Miniatures belongs to a friend/client of mine who happens to play in our RL Blood Bowl league.  (The minotaur I posted earlier in the month is part of this team!)  When I saw this Chaos Warrior w/Chainsaw, he immediately reminded me of a pro-wrestler... so the colors reflect that!  The owner told me he didn't care what color it was, so I added some pink to go with the team he belongs too! Really like how he turned out!
(Vote on him at Cool Mini or Not!)


Monday, October 21, 2013

Chaos Beastman

This is the first (of several) beastmen that I have recently painted for a client to test the color scheme he wanted... will be posting the rest of'em, along with other team members! (yes, yes... more teasers!)
Vote on this Fantastic model at Cool Mini or Not!
www.coolminiornot.com/344289