Showing posts with label Eldar. Show all posts

Friday, May 30, 2014

Jazzy-Jazz: Jain Zar

With the advent of 7th Ed. here, I thought I would reach into my 40k archives and post some pics of some of the work I have done in past months for 40k clients.  Today's post is none other than Jain Zar, the "Storm of Silence!"  Arguably one of the best all-time hand-to-hand combat characters since 2nd ed., this blademaiden still packs a serious punch, and still strikes fear in the opponent when she enters the battlefield!

The Fearsome Jain Zar, Storm of Silence with her Mask of Kaine, Blade of Destruction, and her deftly dance of death!

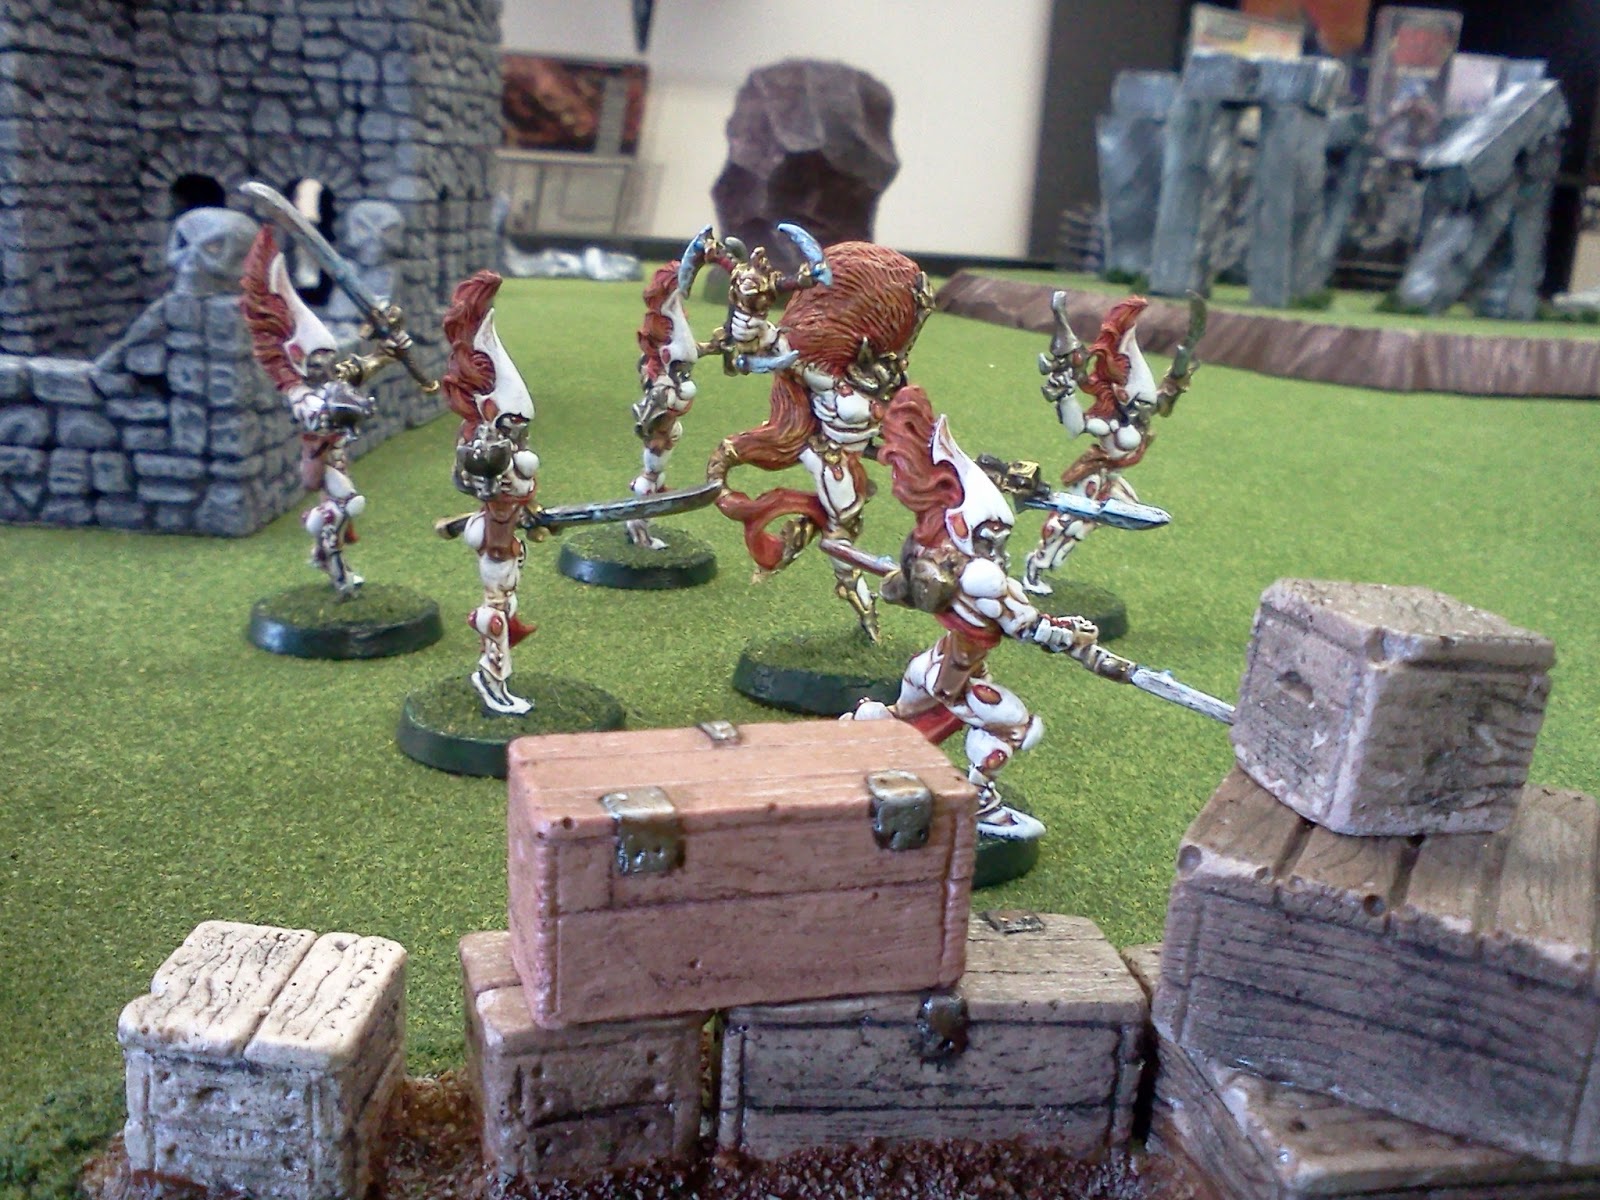
The Blademaiden with her troop of Howling Banshees!

A pic taken from the perspective of some poor Imperial Guardsman, ducking behind some crates hoping that these futuristic she-elves glide by... and leave him alone!

Another angle of the Banshees; their masks are uniquely fitted to amplify the scream of a female elder warrior, emitting a psionically paralyzing shriek to the target!

...another ammo crate perspective!

The Banshee Exarch deftly defending her Banshee mistress from a hail of bullets!
Hope you enjoyed these mistresses of death!
Leave your comments here! :D

Monday, January 20, 2014

Eldar Encounter!

Today is a troupe of Eldar that I needed to hurry and finish up with a growing 40K presence in the store.  A really nice chap whom we will refer to as "Chris" dropped these guys off awhile back, and they just needed to be finished up!
 
These Eldar Guardians are from the craftworld of Saim-hann, fielding the red uniforms with the White helmets, black masks and the Eldar runes of "outcasts" as their squad markings...

They are gearing up, preparing for a battle against a deathwatch kill team, hence the heavy weapon battery attached to them...
 
One of the crew members speaks up, "My Lord, think not that we should invoke the wrath of the D-Cannon on our black clad foes?"
 
The Distortion cannon's crew awaits their orders, prepared to send a blast of galaxy ether into the opponent's unsuspecting squad by opening a conduit into the warp and sucking them into the blackness beyond!

 
The oncoming Marines look determined and unforgiving as the kill team levels their heavy bolters and charge their power weapons...

Who will rein victorious?
Will the D-Cannon hit it's target evening the odds?
Will the Space Marines' bolters unleash their volley's of hellfire rounds pinning the Eldar and rending them to pieces?
Only these questions can be decided on the table-top battlefield as you take command of your army of choice in the game called...
Warhammer 40K!

Wednesday, November 20, 2013

Harlequin Twins... the Final Chapter!

This Harlequin mini (accompanied with the "how to" posts I have shared) has been rather enjoyable!  I hope you have gleaned an insight, or two, from it; I know I have 'relearned' a couple of things during the process of completing it. At long last, here are the shots from various angles of these two Harlequin 'Before & After' Twins!  Hope you will go to Cool Mini or Not and let me know what you think! ;D
(Any pic you can 'click' to enlarge)


Voila!!!
www.coolminiornot.com/345574
(Vote on me at Cool Mini or Not! :D)
 (You can click this link to learn about these mythical Eldar Harlequins)

Tuesday, November 19, 2013

Hairnet to Steel Grating!

With this Harlequin project nearing an end, I thought I would show everyone a cool idea I picked up as a young blood (can't remember where I learned it), but as I was strolling down the street one day I remember this gem of a basing technique when I found this piece of hairnet blowing around on the sidewalk, hmmmm...
 
Wanting to 'pull the eye' on the Harlequin's diamond patterns, as well as unifying the jewels on the left shoulder, I thought "...this would do well for some steel grating on the base!" I was very excited!
 
Here I am 'pre-cutting' the hairnet to make sure it fits properly, and now I am going to take some PVA glue (standard Elmer's craft glue) and glue it down, using a que-tip to 'press down' the net and let the excess squish out to overlap and dry for a nice hard surface.
 
Diving into my 'bits bag' (everyone should have one!) of spare pieces and parts left-over from countless mini-projects, I fished out an Orc boma'stik and began hacking the shaft into small circular pieces for rivets.
 
I then cut a small strip off of a spare business card I had laying around to have some metal framework for the rivets, and started carefully placing them on the dabs of super-glue I put down with the tip of my X-acto knife.
 
 
I then hacked up the remaining pieces of the Ork Stik (with accompanying arms) and made pieces of rubble to glue to the base, adding some sand texture to really give the base some grit!
 
Getting rather excited to finish for this post, along with the late hour last night, coupled with wanting to slap down the paint... I held the mini up to my work light to speed up the glue drying process! LOL!!  Next, I base-coated with three layers of black and began dry-brushing the silver into place!
Using a brass wash with some black added in, I put some 'rust' spots on the base where the grating, framework, and rivets would probably be rusted.  Then I dry-brushed some white over spots with a few white 'highlights' strategically place, and... Voila'! I think the finished product looks great! The diamond pattern on the grating will pull in elements of the diamond pattern on his leg, and the riveted framework will pull in themed elements from the line of jewels on his shoulder!  Let me know what you think! :D
('click the pic' to enlarge)

Monday, November 18, 2013

A Harlequin's Kiss!

Once again, I was away from home last evening and was so glad I had my portable paint station!  I was in a hurry to get out the door, and so I left several of my paints at home, luckily I did bring enough paint to do the jeweling on this guy as promised! 

In these first pics, I mixed together my "Mephiston Red" and "Macragge Blue" to create purple which I watered down heavily to create a wash and then careful added the wash to the base of all the jeweled stones.  I then went back over and put white on them so that the yellows, oranges, and reds that I use will really stand out.  There has been a lot of discussion by miniature painters regarding black, white, and grey primer or 'undercoating.' For me, white seems to do the trick the best when you want something bright to stand out!

These next three pics show the progression from left to right of the 'jeweling'; what is important here is to decide what direction you want the light to come from as the reflection point on jewels tends to be darkest where your directional light is hitting, and you want the direction to be the same on all of them.  The light tends to 'shine through' the underside opposite of your directional light.  I deferred to the 'upper-right' for my directional lighting: Left) I went over every jeweled piece with a dab of red just up and to the right of center; Middle) I added progressive glazes of red to red-purple, to dark purple; Right) I added glazes of red-orange, orange, orange-yellow and yellow with 'stipled' (brush tip) touches of white for highlighting.

Here is the "before and after" to date, with the recent changes (you can 'click the pic' to enlarge it! :D), I am very pleased with how this guy is turning out! In fact, (painting in a public forum), a passerby happened to notice what I was painting, and happened to be 40K enthusiast!  He happened to have some Harlequins (so he appreciated the work) and happened to have just returned back from Venice on business!  And... he happened to have taken some pictures of Italian Harlequin masques and happened to have them on his phone!  We had a fun talk about painting! 

Well, back to the miniature!  The only thing this Harlequin needs is his Harlequin's kiss, and a really cool base... so, to finish him up tomorrow, I will show you how to do some metal grating on a standard base! ;D
 
After I finish and 'seal' this guy, I will go back and add a dab of glossy polyurethane to the jewels to give it that extra glossy shine!

Saturday, November 16, 2013

Harlequin Bliss!

Well, I couldn't let this little guy sit there anymore today, even though I am swamped with work!  He is in bliss now that he has his armor virtually finished! (...will get to that momentarily!)

In my last post, I ended with this Harlequin's armor unfinished, so... keeping in mind color schemes again, I wanted something dark under the tough carapace armor on top; I thought since blue is already being used (as well as yellow) I would go with a variation of it here by using dark blue and gold!  In this pick, I had decided to pull his assassin's needle holster on his leg up with his chest by putting down dark blue on both and highlighting using the glazing technique again.  Getting ready to prep for the gold, and remembering that it is a 'transparent' color, I needed to put down a base coat and thought the citadel "Zandari Dust" would do nicely!
 
Here is the miniature with the base coat of Zandari Dust... now I need to glaze in some depth!
 
There are two things here that you want to keep in mind, first off... if I really want some nice contrast I want "Snow in the mountains, and shadows in the valleys."  In other words, lighten up the ridges, and darken up the recesses on the model.  Next, new painters will default to black to add depth in the recesses, not realizing that adding a dark blue, dark red (or both) will give me a better result because it will pull the other colors from the model in! *wink*

The dark blue I added wasn't quite deep enough, so I am going to mix in an 'ink' wash to add just a little more depth... this "Nuln Shade" should work well!
 
Now that the shades are darker (shadows in the valleys), I am going to go back and lighten up the ridges with a lightened Zandark Dust (snow in the mountains), so that my base layer will reflect properly with my metallic paints.
 
I went ahead and did a wash of dark bronze (Citadel "Baltashar Gold") in the recesses, and now I am going to go in and 'stiple' (very delicately 'push' the gold in the right places with the tip) some bright Citadel "Auric Armor Gold" to really make the gold start to stand out...
 
A lot of painters ask "How do I get that magnificent Gold shine on my mini?"  While this particular gold is very bright, if you don't lay down a proper base, the gold won't show well.  Additionally, once the base is down, and the gold has been put on, you will want to go back and 'dry-brush' some silver on the natural high-lights of the places where the light hits the armor.  Finally, a couple of 'pin dot' points of white will finish it off nicely giving it that shiny gold look!
 
Here is a "before and after" to date.  Tomorrow I am going to go in and do some 'jeweling' and our harlequin will almost be finished... have a great evening!
 

Wednesday, November 13, 2013

A Harlequin Miss!

Recently I was in VA for a Blood Bowl tourney, at FTW games in Modlothian (Richmond), and found a bunch of retro Harlequin Eldar minis on display for sale.  It was obvious by the poor paint, the dust on the base, and the fact that they were throw-backs to the late eighties; that someone had purchased them as a young blood, painted them up, went to college and boxed them up... and there they sat! Probably his young wife forced him to "clean out the closet" so they ended up at the store! Well, I took pity on one and brought it home with the intention of doing a "how to" post on stripping a mini and starting over--so here is the piece as it arrived!  The previous owner sure missed an opportunity on this cool Harlequin mini!
Poor application of color, not a lot of attention to detail, and the dust is still on the base... again, probably a young blood "back in the day"
 
This is the paint stripper that I use on metal minis.  DO NOT use it on plastics as it will melt them!  Make sure you put on rubber gloves or it will give you chemical burns on your skin, and use it in a well ventilated area.  I would also recommend eye-protection.  Once applied, let the mini sit for about ten minutes, and then scrub off the paint with an old toothbrush.  Rinse well with soap and water making sure to get all that paint-stripper off.
 
Here I am using an X-acto knife to clean away the few small areas that the toothbrush could not get to.  Note: Make sure this is a discarded toothbrush, and not the one you are currently using! *wink*
Ta-da! All ready for priming and painting!
 
Super-gluing the model to the base.  I have a bottle of paint behind him to secure him in an 'upright' position as he was a little wobbly in the base.

Next I am going to fill in the gaps in his base with "Fix-it" a chemical welding compound that you can buy at most hardware stores.  Modelers often refer to this as "white-stuff" although this particular brand cures in about ten minutes... so work fast!!!
 
Applying the putty with an X-acto knife (I misplaced my modeling blade awhile back... I think it is time to get another!)
 
Shazam! After priming, here he is ready to have some paint applied to him!  The reason that removing the original layer of paint is so important, is because it preserves the details on the mini... if you don't remove that original paint, the extra layers of paint you apply start to get all gobbed up, and the fine detail of the sculptor is lost!
 
Hope this is helpful to you.  I will be sure to post the process through paint along with the finished product.