Showing posts with label "How To". Show all posts

Friday, January 17, 2020

Proper Venerable Chaplain Dreadnought Livery Conversion!!!

What a GREAT time to be involved in the world of Warhammer 40,000 and the current competitive scene!  It has been such a wonderful experience being involved these past few years, enjoying a hobby that I absolutely love!!! However, as the world of competitive 40k starts to become more "standardized" sometimes there are expectations that can bring some challenges as we adapt.

Being a dedicated Deathwatch player, and having to be creative with the limited unit choices we have to bring to bare, my fellow Xenos hunters have been aware of the Venerable Chaplain Dreadnought for some time.

With the recent change in the meta to be Space Marine Heavy, it seems that the world-at-large has discovered the Venerable Chaplain Dred... and now they are very difficult to find, and I think Forgeworld might have even discontinued them! Soooo... what is one to do?!  Well, here is a suitable conversion that is equitable in size, and (in this hobbyist's opinion) might just fit the bill!

Here is a side-by-side comparison of my conversion on the left, Deathwatch Chaplain Venerable Dreadnought, Gormann the Elder of the Crimson Fists; and the actual Venerable Chaplain Dreadnought borrowed from a friend!


Now, lets get into the actual build! You will need: 1) the Blood Angel Death Company Dreadnought Sarcophagus, and 2) the Blood Angel Furioso Sarcophagus!

Next, you will need to separate the center part of the Death Company Sarcophagus from the side panels, and do the same for the Furioso Sarcophagus! Be careful not to trim too far into the structure of the pieces you will need to glue together!


If you haven't already built the main body of the Sarcophagus, you will want to do that next.  Now glue one of the "winged" panels of the Librarian Sarcophagus to the body.


Next, glue the other "winged" panel of the Furioso Dreadnought to the body.


Now, you will want to put in the Death Company Sarcophagus center piece, making sure it fits before gluing it down.  You can always do a little trimming if need be to get a snug fit!


You may need to put in some green-stuff to take-care of any "major" mistakes.  Now, using your modeling glue to secure the center piece down, put some glue in between the panels and centerpiece to chemically "weld" it together the pieces together! Voila!!


Now, I can put either two close combat weapons on with dual Storm Bolters...


Or, I can put a heavy weapon... like a Lascannon!!!
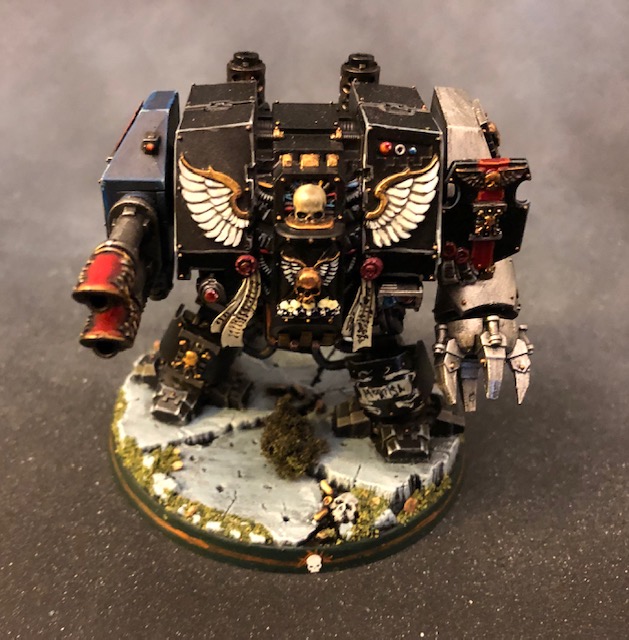

Now we have a very convincing conversion, using all Games Workshop parts, for a solid Chaplain Venerable Dreadnought Conversion for competitive play! Now go out there and get some "For the Emperor!!!"


Thursday, January 23, 2014

WIP: Inquisitor Storm Bolter Converison/Pinning!

I had to chuckle as I was getting ready for this post because some of the people I communicate with online had some recommendations about this very topic being addressed today: that would be pinning models!

Currently, I have been wanting to add a storm-bolter to an Inquisitor model that has been sitting on my shelf for a very long time.  With the recent release of 6th edition 40K, I have to get a token battle force ready and the most easily "alliable" force (in my opinion) is the Inquisition!


Here I am checking to see what the Storm-bolter is going to look like (and where I need to pin in it to the hand) in order to get the right look I am after!

 
I am using a pin-vice to drill a hole into the place where I want the 'pin' to sit in order to glue the miniature together.  Truthfully, it took me a number of years to actually put aside my clumsy mini-hand-drill before I tried the pin-vice.  Take it from someone who has been doing this awhile; make the switch if you haven't already!

After pre-measuring the proper depth in the holes I have drilled with a brass rod, I am now cutting the rod to the proper length that will be used in order to pin the Storm-bolter in place.

VERY IMPORTANT NOTE:
Always check to make sure that everything fits BEFORE you glue it in!
(If you don't... you will be sorry! YES! I am speaking from experience! LOL!)
 
Here I am, holding my breathe while I put a dab of super-glue in the fist with the pin carefully positioned in!
 
Now I am  pressing the glued and pinned hand into the Storm Bolter being VERY careful not to glue my fingers to it as well! :D

Here he is with the Storm Bolter pined to the hand, and the hand and arm attached to the Inquisitor! Ta'da!!!  I am pleased with the result... what do you think?
 
Here is a brief tutorial video which covers the process I just went through with you:

Wednesday, December 18, 2013

One Turn Touchdown!

I am still very active in my local Blood Bowl League, and was fortunate the other day to score a one-turn touchdown!  You study up on the moves, memorize, practice, and when it finally pays-off! Ooooh! So worth it!  My opponent sat there in stunned silence not sure how to react, while I was doing the victory dance and whooping and hollering all over my local game store!

In this pic here against the Norse (not the team I scored on... they were Skaven!), I have circled my catcher No8 who was the one I was able to run it in with and score! :D
 
For a standard human catcher with a MA8 it is going to take three 'chainpushes' to get it done. The following example shows a setup against 3 tight opposing lineman. For this one you'll need 9 players total including 1 being the Thrower in the backfield...
 
1) Step One: Blitz and close the gap... if you can get a "guard" on the line--even better!
 
2) Step Two: Move a player in to close the other gap.
 
3) Step Three: Throw the block and chainpush through!
 
4) Step Four: One last block and chainpush, and the endzone is within reach!
 
This is not as technically difficult as the one I had to do; multiple dodges, and gap plugs because my opponent did not stack his line 'side-by-side' like in this example, but the principle is sound none-the-less! Once you have it down... LOOK OUT!!! :D
 
(Instruction courtesy of http://fumbbl.com/help:HumanOTT)

Monday, December 9, 2013

You Can Do It2: Stonehenge!

One of the things I hear people say all the time when they see my work is, "Wow, that is incredible! I could NEVER do that!" Well... sorry to disappoint *wink* but "NOT TRUE!" :D

One of the purposes in this blog is to contribute to the rapidly growing knowledge out there about miniatures, miniature painting, gaming, etc., and more directly to assist noob enthusiasts with some direction that so many of us (early on) had to struggle through by way of trial and error! 'Nuff said about that!

Today's post is with the help of a patron who meandered into the game store I mini-paint at, and saw me staring at this piece here...
I had just finished putting the sheet of flock down (You can purchase sheets at any legit Hobby Store!) after dry-brushing the edges on this terrain piece, to go on the terrain table there...
 
Seeing the pile of styrofoam rubble laying next to the terrain piece...
(click any pic to enlarge)
He rubbed his bearded chin and said, "Hmmmm, I have an idea... but I have never done anything like this before!  Haven't even touched a paint brushed!"  Chagrined, and with a devious smile I said, "Tell me what your idea is, and perhaps I can help!"
 
He started pulling pieces out of the pile and (with some initial direction) started trimming them up with the Styrofoam cutter I had laying there on the table...
He glued the pieces together and "pinned" them using some long picture nails I happened to have laying around.  After using a black spray primer to base coat, I then showed him how to "dry-brush"; a simple technique which uses feathery-light passes with a brush in order to apply paint to the "ridges" on the object being painted.

Here is a piece that he had finished, setting out to dry...

Once all the pieces had been painted, it was time to show him how to secure them to the terrain piece; I poked a few of those picture nails up through the base of the terrain, and he began gluing them into place...
After gluing the pieces down, he decided he wanted to put a little pathway in, but wasn't quite sure how to do it... so handing him a piece of card leftover from a case of red-bulls, some scissors, and the can of black primer, he went to work...


SHAZAM! For never having any modeling, crafting, or mini-painting experience, this patron really did a phenomenal job! He and I were both really pleased with the result!  I tell people all the time that one of the best tools a mini-painter has in his tool-box is patience, and a few simple tricks (like dry-brushing); anyone can really do it! :D
 
Here are some snap-shots with some Imperial Fist space marines moving in:
Veteran Assault Sergeant reconing the area for his squad...
 
Bringing in the Company Commander!
 
Okay, this is just a REALLY cool shot! :D
 
It was soooo much fun sharing this experience with this patron named Jacob!  And now he has some confidence in his abilities to craft, build, and paint! 
That is (in all honesty) one of the funnest things about what I do here (also one of the biggest "pay-days"), sharing my love for this miniature world with others!  Great Stuff!

Friday, December 6, 2013

Pink Pajamas with Penguins on the Bottom!

My sincerest apologies to all of you faithfuls out there... in the throws of trying to finish up a mega-display (12 foot long) in preparation for a store opening tomorrow! (Eeek!) Truthfully, there was not hardly a second to spare to get up this post yesterday! At any rate, I have been receiving quite a few requests on "how to's" as well as tool spotlights, and some theory... so here is a bit more on "glazing."

I am finishing up some Chaos Warriors for a commission team, and the client wanted a full 'pink diva' look on his Chaos.  Not an easy task on armor, especially when wanting to highlight the subtle shapes.  Only way to get the right look is with glazes.  At the end of this post, I will include a brief five minute youtube video on this technique.

In this first pic I am needing to differentiate between the "high" points on the mini, and the "low" points on the mini, specifically on the armor.  Because the armor is one piece, I can only do this with subtle color changes invisible to the naked eye.  In order to accomplish this, I must patiently pass the brush over the area I want to change with just a tiny bit of paint on it... this is known as a 'glaze'.  Here I am beginning to add some purple shading to the lower, shady portions of the armor... you can barely even see the difference.
(click any pic to enlarge)
 
Increased, but more defined differentiation due to the increased amount of shading that has been provided, it is easier to see that shading on the model accomplished by more application of paint through glazing...
 
Still more differentiation because I have applied some glazed highlights to the miniatures... the definition is just now starting to show.
 
Finally, even more increased differentiation by glazing in highlights to the 'higher' points of the model, with definition and contrast resultant from the shaded glazes as well; as I have state before, putting 'snow in the mountains' (light paint on the high points), and 'shadow in the valleys' (darker paint in the recesses), there is nice differentiation and depth! (I am now adding the black trim to the armor as well to make it really 'pop'!)
 
Well, here is a teaser for you... I will be posting the "four horsemen of the apocalypse" tomorrow! Notice how the glazing has created subtle color palette changes so fine that you cannot differentiate exactly where the change begins, and where it ends... that is the result that one wants through a glazing technique; not fast but very effective!
 
www.coolminiornot.com/346649

I was surprised to find myself chuckling as I was loading this pic, which reminded that someone once told me the chanting in the theme song from the Lion King strangely sounds like they are chanting "pink pajamas, penguins on the bottom"!!! LOL
Thanks for having a look! Catch ya tomorrow! :D
 
(you can vote on this guy at Cool Mini or Not!)
 
(Here is a link to a decent five minute video that briefly shares some glazing theory and technique by "miniwargamerj")

Wednesday, December 4, 2013

Frosty is the Color Scheme!

With Christmas around the corner, and prepping for another commission job based on a "wintery" Grimm's Fairytales theme, I thought I would share a bit about color theory...

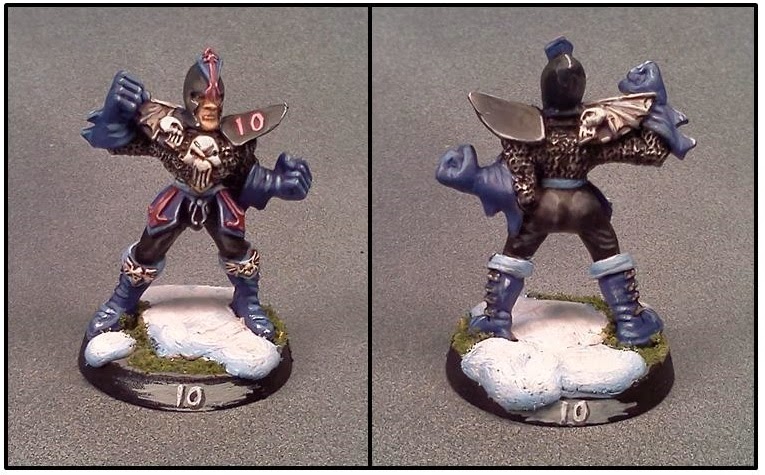
I am finishing up a job for a client (which I am excited to post!), and prepping for another commission job with another client.  I always do a 'one-off' approval piece before I get rockin' on the assignment.  This is a GW Dark Elf Lineman for a Blood Bowl Team "Grimm's Reapers."  The client based the team around a wintery theme, and my initial proposal was the following color scheme:
 
This was an attempt at an "analogous" blue color scheme.  Blue is a very interesting color; it is a color of trust (which is why salesman, attorneys, and police use it), as well as an appetite suppressant (want to lose weight? Put a blue light bulb on your fridge, or eat with a blue plate! LOL!), for our purposes here, it is a 'cooling' color and is definitely a 'winter' color.  Looking at this chart below, you can see different color scheme possibilities as it relates to how colors compliment each other:
(click the pic to enlarge)
 
If you rotate the "analogous" arrows from the blues toward the purples and into the reds, you will see in this next pic I simply 'adjusted' my color palette over a bit to bring in a cranberry (also a winter color), which contrasts nicely with the blues to add a little 'pop' to the miniature!
(click the pic to enlarge)
(vote on this guy at Cool Mini or Not!)
 
Notice how the cranberry color adds just enough between the thigh armor, head-piece, and number to add just the right "punch" of color, without compromising the color scheme.  Additionally, the white snow on the base pulls in the skull and bone nicely to add a subtle visual 'completeness' to the mini, giving it a well-rounded "wintery" feel. 
 
I think the owner will be happy with this little adjustment, and will give me the "thumbs up" to move forward with the rest of the team! I'll let you know what he says!
 
Hope this is helpful... let me know what you think, feedback is always welcome and appreciated! :D

Tuesday, December 3, 2013

Post Dremel Despoiler Done!

Well, yesterday I highlighted the Dremel tool (specifically the cutting tip), and promised a "how to" with some dry-brushing... so here it is:

Now that Lord Borak's base is cured, and I have primed and painted some glazed highlights on his armor, as well as the skull-headed boot (I am sure he uses to foul payers with! :D), let me cover some basics on the dry-brush...

Here are two colors, Citadel's Celestial Grey and Ceramite White...
 
I am going to start by putting some feathery-light touches on this base with this dry-brushing brush...
(click any pic to enlarge)
 
I am going to make sure that there is just enough paint for it to "stick" to the ridges in the sculpted base, so I will wipe off any excess I might have on some paper towel...


As I pass the brush over the base, I am being careful to ensure that they are "feather-light" almost caressing the ridges of the sculpt so that the dry-paint will stick...

After dry-brushing on the grey, I am going to pass over the same area with some white to increase the 'depth' between the darkness in the shadows, and the highlights on the ridges, thus giving some real texture to the base...

If you look at the previous pic just before the one above, you will notice a subtle but important difference in the two photos; the first with some grey highlights, but notice how the second one 'pops' more with definition!
 
Here is the finished model!
(click the pic to enlarge)
www.coolminiornot.com/346512
 
Let me know what you think by going to Cool Mini or Not and voting!
Hope this simple dry-brush tutorial was helpful! :D
Any feedback you have is welcome.